


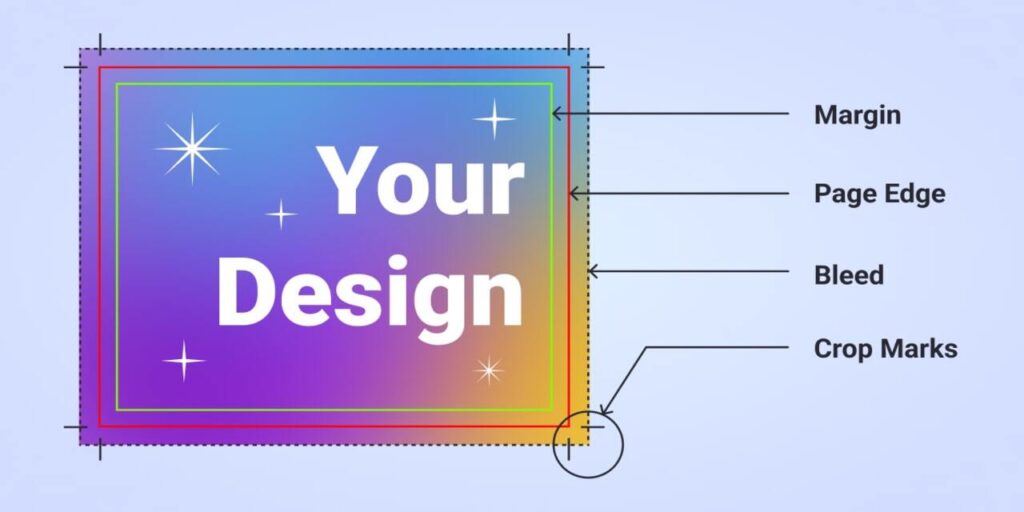
What is Bleed?
Welcome to an enlightening journey into the world of digital printing. Today, we dive deep into understanding bleed and safe margins, the unsung heroes of flawless design outputs. If you’ve ever wondered why your printed design occasionally lacks that professional touch, or why some elements awkwardly touch the edge of your paper, the chances are high that you’re not utilizing bleed and safe margins effectively.
Don’t fret, though! By the end of this article, you will have the knowledge and confidence to effectively explain bleed and safe margins in digital printing to anyone. Let’s roll up our sleeves and get started!
What is Bleed in Digital Printing?
When you print a design that extends to the very edge of the paper, you’re dealing with something called ‘bleed’. Let’s break it down. Imagine you’re creating a stunning full-color brochure. Your design has vivid, beautiful colors reaching every corner of the layout.
But here’s the hitch! Printers can’t print right up to the edge of the paper. So, to get around this, you print your design on a larger paper size and then trim it down. That extra bit of design that extends beyond the final size is called the ‘bleed’. Without proper bleed, you might end up with unsightly white borders around your print, and nobody wants that!
Why is Bleed Important?
Picture this: you’re on a tight deadline to deliver a stack of business cards. You’ve prepared an eye-catching design, and as they start printing, you realize your printer can’t print edge-to-edge. It’s not a pretty scene, is it? This is where the magic of bleed comes into play.
Despite being unseen in the final product, bleed is essential for maintaining design continuity and ensuring a professional finish. It allows printers to account for minute inconsistencies in printing and cutting, ensuring that your design isn’t marred by white edges or misaligned cuts. So, while bleed might be the unsung hero of your design, its importance can’t be overstated.
Understanding Safe Margins in Digital Printing
We’ve talked about bleed, but there’s another vital element to consider: safe margins. Picture this as an invisible boundary inside which all your vital design elements reside. In essence, a safe margin is a buffer zone.
This margin ensures that critical text or images aren’t accidentally trimmed off or too close to the edge of your final print. Generally, setting a safe margin of at least 3 to 4mm from the trim line is a good rule of thumb, though this can vary depending on your printer’s guidelines.
Safe Margins: The Savior of Your Design
Imagine you’ve spent hours creating a killer flyer. But when it comes back from the printer, you find your contact information is partially cut off. How frustrating, right?
That’s why safe margins are your savior. They’re the unsung protector of your design, ensuring all your critical information is safe from the guillotine of the trimmer. So, when you plan your next design, give a little nod to safe margins. Your design will thank you!
Bleed and Safe Margins: Two Sides of the Same Coin
In digital printing, bleed and safe margins are truly two sides of the same coin. They work in harmony, balancing the precision of print and trim with the aesthetics of your design. The interplay between bleed and safe margins ensures your final printed piece looks exactly how you intended it to, without any unpleasant surprises.
The Delicate Dance Between Bleed and Safe Margins
The dance between bleed and safe margins is a delicate one. Too much bleed without adequate safe margins can result in important design elements being cut off. Conversely, excessive safe margins with insufficient bleed can lead to unsightly white borders.
This delicate balance might seem intimidating at first, but once you get the hang of it, it’s as natural as breathing. It’s all about ensuring your design can gracefully survive the trip from digital canvas to physical print.
Mastering Bleed and Safe Margins in Your Design Process
You’ve got a grip on the concept of bleed and safe margins now. So, how do you incorporate them into your design process?
Setting Up Bleed and Safe Margins in Popular Design Tools
Most popular design tools, like Adobe InDesign or Illustrator, allow you to set up bleed and safe margins directly in the software. For example, when you create a new document in InDesign, you can specify the bleed and slug right at the setup stage. Similarly, Illustrator has an option to add bleed in the ‘Document Setup’ panel.
If you’re using a tool that doesn’t explicitly support bleed or safe margins, like Microsoft Word, don’t worry! You can still simulate them by increasing your page size for bleed and using guides to denote safe margins.
Common Misunderstandings About Bleed and Safe Margins
Even for experienced designers, bleed and safe margins can sometimes be a source of confusion. Let’s debunk some common misconceptions.
Bleed and Safe Margins: An Optional Extra?
Some designers may view bleed and safe margins as an optional extra, something to be added if time permits. This couldn’t be further from the truth. Regardless of the project’s size or scope, bleed and safe margins should always be an integral part of your design process.
FAQs About Bleed and Safe Margins in Digital Printing
- What is the standard bleed size for printing? The standard bleed size for most print jobs is 3mm. However, this can vary depending on the printer’s specifications.
- What happens if I don’t use safe margins in my design? If you don’t use safe margins, critical text or design elements risk being cut off or too close to the edge in the final print.
- How do I add bleed in Adobe Illustrator? You can add bleed in Adobe Illustrator by going to the ‘Document Setup’ panel and specifying the bleed size.
- Do I need bleed for digital printing? Digital printers cannot print edge-to-edge, adding bleed ensures your design has a professional finish, free of unwanted white edges.
- Why are my prints not cutting correctly even after adding bleed? This could be due to misalignment during cutting or issues with the print file. Always ensure your file has the correct bleed and trim marks.
- Can I add bleed and safe margins after designing? While possible, it’s recommended to set bleed and safe margins at the beginning of your design process to avoid any adjustments later.
Conclusion: Bleed and Safe Margins—The Key to Professional Prints
Bleed and safe margins in digital printing are more than just technical terms; they are the pillars of professional-looking prints. Once you grasp the significance of these elements and incorporate them into your design process, the difference in your print quality will be night and day. So